Friday, April 30, 2021

Goodbye, viewers!

My reason for writing this blog was to clarify my thoughts about how to solo wargame.  Along the way, the blog documents my journey.  Where I have ended up is with a combination of One Hour Wargames and The Portable Wargame; rules from the former and boards from the latter.  My figures started at 54mm but I have settled on 1/72 or 20mm.  My games are historical, science fiction or whatever seems exciting at the moment.  There is no need to commit to one era.

The blog will remain available but I do not plan to post any more.  Instead, I might write occasionally in the Lone Warrior, the SWA blog, and briefing comments on Facebook.

Hopefully the ideas published here will be useful for others who are entering solo wargaming as an absorbing hobby.

Best wishes!

Tuesday, April 27, 2021

Trench Zombies: An Evade and Escape Scenario


Putting your human army into defensive positions and just fending off zombies is exciting but loses interest after doing it three times.  In this scenario, a column of British infantry seeks to cross the battle field from right to left, evading and escaping as many units as possible off the left edge.

Movement rules on a gridded board prohibit diagonal movement for any unit.  This is important. 

Zombies can only move one square, except fast zombies can move two squares.

Infantry can move two squares, except the elite survivor team, which can move three squares.

Shooting can reach across two squares into a third square. 

The battle plan for the British was to move the elite unit toward the zombies so that it could inflict some damage by shooting while regular infantry crossed the field.  Both heavy infantry units were to take up positions behind and to the left of the elite unit so that they could shoot also when the elite unit withdrew. 

This worked well enough until the heavies were blocked by some terrain features.  Caught by zombies, H2H followed.  Other units flanked the zombies, but more zombie units were drawn to the melee. 

The British army benefited by drawing some lucky cards.  This makes a difference in the outcome.

At the end of the battle, one British unit had managed to leave the field and one zombie unit was still upright.   I would call this a draw.  In my opinion, a draw indicates that the sides are fairly even and it is a good game. 


An Elite Anti-Zombie Unit


The previous posts have shown that human soldiers are at a great disadvantage against trench zombies.  This poses a problem if you want humanity to have any hope.  Therefore, in keeping with the general story line of most zombie movies, I have invented a new type of human soldier unit. This is the Survivors unit. 

When the undead rose in the trenches, most of the living soldiers in the trenches were killed.  However, a few survived.  These soldiers were unusually quick, effective in H2H combat, and skilled marksmen who instinctively aimed for the head. They are depicted in my human army as kneeling marksmen who are still covered with trench mud.  Based three to a unit.  They get D6+2 in both shooting and H2H.  They move twice as fast as regular infantry and can run in reverse with no hesitation.  If any unit can survive, it will be the Survivors Unit.

Readers (if there are any) will note that the WWI zombie wars do not require expensive figures.  Paint-conversions of Airfix 1/72 figures work just fine for me.


Monday, April 26, 2021

A WWI Zombie Battle


See the previous post for the zombie units.  The standard zombies can move one square and get plus D6+2 when hitting.  Fast zombies can advance two squares, hits=D6+2.  Shooters advance one square and get D6 when shooting but D6+2 in H2H.

Human units get D6-2 hits against any zombie unit, except heavies, which get D6.  

Hits uphill are divided by two. Flanking hits are times two. 

The solo wargame cards from One Hour Wargames were used.

The zombies are advancing across the field from left to right.  The British enter from the right.  Notice that they enjoy three fortified positions.  The bridge in the center does not allow them to be flanked when two units are on the bridge.  The green squares on either side are hills, which give the occupants the advantage for forcing the zombies to fight uphill. Also, the blue squares indicate water so the zombies can only attack from the front.

The first time I played this, the British knew nothing about zombies so they advanced toward the center.  By the time they realized they were in trouble, too many units were destroyed.  A few survivors gathered on a hill but were soon overrun.

The second time through, the British had intel about the threat they were facing.  They sent the cavalry unit forward to scout while the other units remained in their defensive positions.  The cavalry could move three squares.  At first sight of the horde, the cavalry fell back to the bridge. 

Zombie units mindlessly slogged forward through withering fire until they could grapple with the British hand to hand.  The British units in face-to-face combat held on long enough to allow another British unit to flank the attacking zombie units.  This destroyed some zombie units, but at great cost.  When the shooting zombies got within range, they fired with more effectiveness than the British.  

At the end of the second run-through, two British units survived.  However, I think I could have been more effective, so I will try again. 

The third time went badly.  The British used the same battle plan.  They quickly pulled back the scouts and waited for the zombies to get in range, then fired with great inaccuracy, rolling 2 after 2.  The zombies first took out the bridge units, then some wandered toward the eastern hill and others toward the southern hill.  The shooter zombie unit had been peppering the British on the southern hill to great effect.  

When the 15th round was over, two British units were still operating and three zombie units.  However, the British were badly wounded.  It was clear that they would not survive another round. 

Well, what do you expect to happen in a battle with zombies?


Sunday, April 25, 2021

A WWI zombie army

 During WWI, a British company stumbled into a battle against units of undead soldiers risen from the trenches and marauding the countryside.  Types are as follows.

Shambolic.  This is the most common zombie.  Based with six figures.  They move slowly and cannot shoot.

Fast.  Less common.  Their speed more than makes up for smaller numbers.  Hand to hand only. Three on a base.

Smart.  The rarest kind of zombie, they can pull the trigger.  Three on a base.

The British units may have to fight hand to hand if they cannot destroy a zombie unit by firing.


The feared shambolic zombies


The twice-feared fast zombies


The thrice-feared shooter zombies.


Thursday, April 15, 2021

Rupert of the Ore Mountains vs Jan of the Free Bohemian District (Imagi-Nations)


Rupert, the younger son of the King of Saxony, was graciously granted authority over the Ore Mountains by his father.  His father gave him only one instruction: Do not get us into a war.  
Rupert was happy with his assignment, even though it was as far away from the capitol as possible.  Shortly after arriving in the Ore Mountains, he noticed a village in the foothills on the northern bank of the Ptz River. This was the village of Grnczy.  The Ptz flowed into the Moldav River.  Rupert graced the villagers with his presence and while visiting them explained that the Ptz was the natural southern boundary of Saxony.  He left a small garrison consisting of one unit of pike and shot.  Then he returned to his base.  He also placed other units in the nearby mountains just in case they were needed as reinforcements.  His forces also included two units of mounted hackbutters who were located north of the mountain range.

The villagers queried General Jan of the Free District in northern Bohemia about their new nationality.  Jan was not pleased.  A small army marched across the bridge over the Ptz.


The garrison in the village of Grnczy held out heroically until reinforcements arrived from the mountain garrisons.  The shot units fired back and forth until the Bohemians ran out of ammunition, allowing them to charge.  After the melees commenced, the reinforcing Saxon units were unable to shoot into the scrum.  Units on both sides began to collapse.  At the end, the Saxon army prevailed.  Its two surviving units were badly mauled, however.  

The campaign to free Ptz had just begun.


Sunday, April 11, 2021

Scenario 5/Bridgehead/Ancients


In this scenario,  the Britons are on the right (south) and the Romans are on the left (north).  The battle starts with one unit of Briton skirmishers north of the river.  My intention was to immediately move them into the trees where they had cover.  No other unit types can enter the trees. 

After a few rounds, the Britons had formed an elegant defensive posture.  They waited for the Romans to start the dance.  


Truth in advertising: this was my third attempt.  The Romans won the first two.  The Britons were trying to get smarter.  The defensive formation worked well for several rounds but eventually the Romans broke it apart.  At the end of 15 rounds, the Britons still had the skirmishers in the woods, so technically it was a win for them.  However, the unbloodied Roman skirmishers were on their way and it was clear who would have won if they battle had lasted longer. 


Thursday, April 8, 2021

Mars figures, Thirty Years War

 Airfix does not make sets for the Thirty Years War, so I took a chance on Mars figures.  See pictures.  The price was low and I was very pleased with the figures.  Not much flashing.  Sufficient definition for me.  Nice combination of poses.  Paint adhered easily without washing first.

I was looking for Reiters but the mounted arquebusiers seem to fit.  The infantry set only had three swordsmen, so I need to time-travel in some others, along with regular cavalry.


Tuesday, April 6, 2021

Scenario 3/Control the River/Boadica vs Romans


These armies have been improved somewhat.  The bases are now narrower than the fronts.  All the figures are from the correct era.  Airfix Ancient Britons and Romans are used.  I supplemented the Romans with Hat Gothic cavalry, who are working as mercenaries.  The other change is I bought a big bag of dice and used them to keep track of hits instead of hash marks on a note pad.  

The first picture shows the Romans lined up and ready to advance.


The Britons moved aggressively across the river.  They charged the skirmishers but the Goths flanked the Celts and the Briton's chariot flanked the Goths.  What a mess. Meanwhile, at the eastern crossing, two infantry units slug it out.  The Brit skirmishers cannot get a clear shot, nor can the Brit archers. 


After the dust settled, most of the units were scattered.  All the infantry were gone on both sides.  The British skirmishers retreated up the hill and waited for the cavalry to charge them.  However, the cavalry just waited for the Roman skirmishers to get into range and let them do all the work. This was the situation at the end of the 15th round.  Boadica lost.  Darn.  


Saturday, April 3, 2021

One Hour Wargames/Machine Age/quick army

The machine age, in OHW, ranges from 1900-1939.  The units are cavalry (dismounts and shoots), artillery, infantry and heavy infantry.  Heavy infantry have machine guns.  All combat is by shooting; no hand-to-hand.

Airfix WWI sets in HO scale are readily available.  If you choose to pit the Germans against the British, one box of each will provide both infantry and heavy infantry.  The cavalry and artillery units could be set up by purchasing horse artillery.  For example, the Royal Horse Artillery set contains usable horses and a cannon.  You could base three horses together with three infantry men standing beside them to represent the riders.  The cannon can be based with a couple of spare figures.  The artillery base should have 2"-3" fronts.  The other units have 4"-6" fronts.

Four sets make up two armies.  Watching for sales, you might be able to get them for less than $10 each.

In my inexpert opinion, you could use these armies in Europe any time after the ACW.

Sunday, March 28, 2021

Facebook?

 A couple of years ago I dropped out of Facebook because of rude partisans on both sides of the political spectrum and the absence of a mechanism to keep them out of my feed without hurting feelings.

But recently I learned about a https://www.facebook.com/groups/wargamingntrule/?ref=share. This group is for people who love One Hour Wargames and other books written by Neil Thomas.  Scenarios from OHW frequently are employed by members. The members of the group and friendly and supportive.

Yes, I went back to Facebook.  But this time I set it to have no friends and all my posts are private.  I do not post except on the Neil Thomas page and I do not read the feed.

We will see if this works out better than last time.

Tuesday, March 23, 2021

Scenario 7/Dark Age

The reader may have noticed that I am using Airfix figures.  Airfix did not make Dark Age sets, so here is my substitution process:

  • French cavalry for Dark Age cavalry.  Note: cavalry dismount to fight.
  • Roman legions for infantry.  This includes men with swords and axes (warband in the Dark Ages), spearmen (infantry) and a few archers.
  • Merry Men set.  This provides archers (assumed to be Dark Age skirmishers) and stick fighters (treated as regular infantry).

Net result is warbands, cavalry, regular infantry and skirmishers.  One Hour Wargames rules call for random selection of units, but I do not have enough of each to allow for that.  Still, I am able to mix them up somewhat and neither side has exactly the same mix of unit types in this battle.

Scenario seven has a large hill on the north side.  All of the Danes are on that hill. Two Saxon units are on the small hill to the south and four Saxon units are hidden on the east side. See pictures 1-3.  The Danes are mostly blue and the Saxons are mostly green.


Picture 1.

Picture 2.

Picture 3.

The Saxons march down from the hill and move north.  These two units are skirmishers.  The Saxons on the east emerge from hiding and begin to flank the Danish units on the hill.  The Danish cavalry descend from the hill and one charges toward an infantry unit. Not a smart move; another Saxon infantry unit flanks it and now the cavalry are in a sandwich (Picture 4). 


Meanwhile, one Saxon infantry unit runs up the hill and charges a Danish warband (Picture 5).

Picture 5.


Picture 6.  The Saxon skirmishers are throwing javelins up onto the hill. (Use your imagination, for Pete's sake.)


Picture 7.  A Danish cavalry unit is swinging around for a flank attack on the skirmishers.  

The flank attack on the Saxon skirmisher unit could have wiped them out but the die turned up a 1: only 2 points damage.  The skirmishers turn to face their flankers and now it is shield-wall against shield-wall.  Neither side can do much damage.  However, on the east side of the battlefield the Saxons wipe out the Danish cavalry then gang up on the infantry.  Two-on-one carries the day every time.  At the end, only the Danish skirmishers are left and they are smashed as soon as the Saxon infantry can reach them (Picture 8).


A good dark age site

 https://darkages40and25.blogspot.com/2021/

The author reports his battles in a clear and understandable way.  His layout is achievable but most with a little effort and his suggestions make sense.

Monday, March 22, 2021

Scenario 6/Dark Age


Uhtred is leading the English Saxon army against Guthrum the Unlucky.  Both sides have five units. Guthrum has two warbands, one infantry, one skirmisher, and one cavalry.  Uhtred has two warbands, two skirmisher units and one cavalry.  Guthrum seeks to travel from south to north and exit the field on the north side.  Uhtred intends to flank Guthrum's army at the opportune time.  Timing is important.


Picture 1.  Initial Positions.


Uhtred had positioned two warbands at the north edge of the field, blocking the road.  As the Danes move northward, the Saxons launch their flank attacks.   The two Saxon skirmish units are trying to get close enough to throw javelins but not so close that the Danes can rush them.

Picture 2.  The Saxon cavalry hit a Danish warband in the rear but the Danish cavalry then flanked them.


The Danish infantry and one warband reached the roadblock at the north end of the field and all units formed shield walls.  Somehow two skirmish units found themselves in a hand-to-hand battle.  I assumed that they formed clumsy shield walls. The other Saxon skirmish unit is unable to help any of its fellows because they cannot throw javelins into a melee (picture 3).  The Saxons seem to be squandering their surprise attack.

Picture 3.  The flanking maneuvers are going badly.

However, it turned out well for the Saxons.  As expected, the Saxon cavalry was scattered, allowing the Danes to go after the Saxon skirmishers. The first Saxon skirmisher unit finished off its opponent but had taken several hits in the process.  The Danes quickly destroyed one skirmish unit.  However, the Danish warband on the north was scattered and the Saxon warband then flanked the Danish infantry unit.  Assaulted from two sides, it collapsed.  The Saxon warbands rushed toward Danes, arriving too late to save the last skirmisher unit but soon enough to destroy the warband.  The Danes only had one unit left, the cavalry.  They raced for the northern edge of the field and escaped (picture 4).  

Picture 4.  The Danish cavalry escape.

None of this unfolded as expected.  However, the Saxons won.  The Danes needed to exit three units to be declared winners. Guthrum the Unlucky was lucky at first but his luck ran out in the end.


Thursday, March 18, 2021

Scenario 5: Uhtred vs Ubba

 In the previous post, Saxon invaders led by someone I called Uhtred were fighting the British king, Arthur.  Fast forward a couple of hundred years.  We are still in the Dark Ages.  The Saxons succeeded in conquering most of England.  A Saxon English king, Alfred, is defending against a Danish invasion.  In this scenario, Uhtred of Bebbanburg, a descendant of the  first Uhtred, is leading the English forces in a battle against the fearsome Danish warrior, Ubba.  This plot line is taken from the popular series about Uhtred authored by Bernard Cornwell.  In Cornwell's story, the English forces are on a hill but they descend to set fire to the Danish boats.  I am using Scenario 4 from One Hour Wargames, so there are no boats.  English forces will stay on the hill as long as they can.  Ubba will attempt to take the hill.

All units will form shield walls when fighting face to face.  The archers actually are skirmishers throwing javelins.  They will avoid hand-to-hand combat. Cavalry units travel fast but are assumed to  dismount and fight on foot when they see an opportunity for a flank attack.  They will form shield walls in face-to-face battles.

Note: north is to the left in the pictures.

The armies position for battle.  The Danes are on the right (south).  They will attack the hill frontally and also flank the east and west sides of it.  The cavalry on both sides are holding themselves in reserve.  The first picture shows the flanking and frontal attacks have begun.  The English attack the western Danes on the flank. 


Picture 1.  The battle is joined.


Both of the English units on the hill have the uphill advantage against their frontal attackers.  Also, they are in shield wall formation, so that reduces hits even more.  However, the flank attacks are devastating and the hill is taken by the Danes (picture 2).

Picture 2.  The Danes take possession of the hill.

All is not lost for Uhtred, however.  The Saxon skirmishers continue to throw javelins at the Danes on the hill (picture 3). The English Saxon cavalry flanks the Danish skirmishers and quickly routs them.  That unit now is ready to flank the Danes from the east side of the hill.  The Saxon infantry finishes off its opponents and now can move up the hill from the west.   

Picture 3.  The Danes have the hill but now Uhtred's army can flank them.


The Danish infantry on the hills rushed down the north face to attack the skirmishers, a move that would quickly scatter the skirmishers under normal circumstances.  Both sides formed their shield walls.  The Danish cavalry formed shield wall against the Saxons climbing toward them on the west side and destroyed them.  However, the Saxon cavalry and skirmishers wiped out the last Danish infantry unit (Ubba died bravely in a axe-vs-sword fight with Uhtred) and then hit the Danish cavalry.  It was quickly routed, leaving the Saxon cavalry in possession of the hill (picture 4).


Picture 4.  Uhtred's cavalry possess the hill.  


This battle washed back and forth across the hill.  The action was rapid and both sides fought well.  In the end, the skirmishers and the cavalry carried the day, which is an interesting result. 

Being a fan of the Last Kingdom series, I found pitting Uhtred against Ubba on a hill very exciting, since that is where they fought in the book. Uhtred will fight another battle against Danes next week.  


Wednesday, March 17, 2021

Scenario 4: Arthur's Dilemma

 This is a dark age battle.  King Arthur is defending Britain against a Saxon invasion led by Uhtred the eldest.  Arthur is on the north side (left in the picture) and Uhtred is coming up from the south (right side).  

Previously I learned that conventional figure bases are necessary in battles that have a hand-to-hand element.  This in turn requires a bit more space so this battle is back on the card table and not on the floating grid.  

Notice that a road runs left to right across the battlefield.  It is not helpful.

Scenario 4 has a hill in the center that is occupied by two of Arthur's infantry units.  Arthur also has two units of skirmishers, one cavalry and a reinforcing infantry unit.  Due to a shortage of skirmish figures, I am using archers to depict skirmishers.  Just assume they are throwing javelins instead of shooting bows.

Uhtred has four infantry units, one skirmisher unit and one cavalry unit.  I chose not to include a warband, making the assumption that all infantry would form shield walls when fighting face-to-face. 

In the first picture, the Saxons are advancing toward the hill.  The cavalry is sheltering behind some trees.  The skirmishers are approaching toward the point where they will be within range.   They will avoid hand-to-hand combat if possible.  If necessary, they will attack on the flank.  Frontal attacks with skirmishers are suicidal. 


The fourth Saxon infantry unit moved toward the west side of the hill where they were met by the first British infantry.  They formed shield walls and went at it. When the first Saxon infantry unit was close enough for a flank attack on the east side of the hill they charged, as did the two infantry units on the south side.  The hill was encircled on three sides.  If the Saxons could scatter their opponents, they would be able to rotate and mount a flank attack on the hill.

The British infantry units on the hill enjoyed protection from the elevation and also protection from their shield walls. The Saxons were doing a lot of damage with their flank attack but not so much with their uphill fights.  The British skirmishers were hurling javelins at the Saxons who were flanking the hill.  The Saxon skirmishers were throwing at the British skirmishers.  

Eventually, the first British infantry unit on top of the hill was broken.  The Saxon infantry unit who had been flanking it took possession.  But the British cavalry who were holding reserve rushed over to flank attack the Saxon position on the hill.  Already weakened by javelin fire, the Saxons were routed. The British cavalry continued on over the hill to attack the Saxon infantry on the slope.

Meanwhile the Saxon cavalry emerged from hiding to assault the British skirmishers on the flank and scatter them.  Units were being routed right and left.  The Saxon cavalry flanked the British cavalry and destroyed them. At the end, the first British infantry had managed to relieve the hill but they were faced by Saxon cavalry on the other side of the hill and the surviving Saxon infantry unit was approaching down-slope (see second picture).  This was the 15th round and the battle was over.  27 minutes elapsed time.   


Sunday, March 14, 2021

Scenario 3: Boudica's Revolt

 In AD 60, Queen Boudica led a revolt against the Imperial Romans who occupied Britain.  She marched on Lindinium to wreak havoc on the oppressors.  The Imperials were caught off-guard.  

This battle uses Scenario 3 from One Hour Wargames.  The western ford is shown in picture 1.  Boudica's forces are on the left (north).  Boudica had two cavalry units, one light infantry and three heavy infantry units.   The second picture shows the eastern ford.  The Imperial Romans had one archer, two light infantry at the western ford, and three heavy infantry units at the eastern ford. 

Most of the action took place in the fords.  Two units could engage two other units face to face on the narrow passages. Flanking was only possible after one of the facing units was destroyed.  In addition, the Roman archer unit was able to pepper the Celtic heavy infantry unit that was waiting in reserve.  Those Celts finally had to withdraw out of range because they was taking hits while not giving any. Both Celtic cavalry units were shattered.  This was not good for Boudica, but meanwhile the cards and the dice were helping her army.  The eastern ford was taken by the Celts.  In the next turn, the western ford fell also.  Only the Roman archers survived (picture 3).  

The battle was exciting and lasted 29 minutes.  This was my first ancient-era battle and I enjoyed it.  The OHW scenarios work as well for the ancient era as they do for machine era or any other.  Being short of ancient cavalry, I substituted Maid Marion from the Merry Men set and one WWI cavalry rider from the WWI horse artillery. 

Note: My figures are individually based instead of based with a frontage of 4-6 inches as recommended by Thomas.  This battle finally showed me the reason for the recommended basing.  Had I based them correctly, only one unit could have been in a ford at a home time. No flanking would have been possible.  More units would have been forced to wait in reserve until the units in combat were broken.  This would have extended the battle.  


Thursday, March 11, 2021

Tactical Principles for Wargaming


Most countries have lists of principles for wars.  They tend to look about the same but with different principles emphasized in different armies (https://en.wikipedia.org/wiki/Principles_of_war).  

Drawing from those lists plus other material about Clausewitz and von Moltke the elder, I came up with this list.  It might be all wrong but I am trying to use them in my battles. 

1.  Concentration of force.  The force multiplier effects allows a concentrated force to break through the enemy line.  However, only a dummy (like me) will put all his forces into one blob and ram them against the enemy.  The enemy will swing his units around and attack you from multiple directions.  See number four below.

2.  Economy of force. Do not use many resources in areas other than the main objective.  If you have to take some risk by weakening secondary areas, it is worth it.

3.  Maneuver.  Selectively apply combat to gain positional advantage.  Goad or lure the enemy into the position where you will have the advantage.  See number five below. 

4.  Encirclement. If possible, bring the enemy to battle on more than one side. See number six below.

5.  Strategic offense/tactical defense.  Lure the enemy into attacking your well-fortified position.

6.  Units travel separately.  Send your units toward the enemy separately rather than as a combined force.  Plan to swing around and hit them on more than one side. 

Do you agree?  What have I left out?


Wednesday, March 10, 2021

Personality and Solo Wargaming

 Overgeneralizing is dangerous, but assuming solo wargamers are more introverted than social wargamers might not be a big risk.  Introversion is a technical term so I should be careful about what I say on the subject, not being an expert.  However, I am an introvert so maybe I know enough.

Googling will lead to all kinds of half-baked info about introverts when compared to extroverts. For example:

  • Introverts are more sensitive to criticism.
  • Introverts are stingy with praise. 
  • Introverts need less stimuli to remain mentally alert. 
  • Introverts are stressed out by a lot of stimuli. 
  • Introverts are more prone to depression. 
  • Introverts would be happier if extroverts were not so annoying. 

This is relevant to solo wargamers because we could become socially isolated.  We may be less social than extraverts, but we still need some social interaction.  

Here are my suggestions.

1.  Using appropriate caution, browse appropriate social media sites such as the Lone Warrior and offer a supportive comment now and then when you read something interesting.

2.  When you are feeling more bleak than you want to feel, reach out to other solo wargamers for a brief interaction on the subject of solo wargaming.  It will affirm your own identity.  

3.  De-clutter.

4.  Start a campaign and fight a few battles in the same era with the same rules. This will be easy and enjoyable.  We do not have to learn new things all the time; using what we already know is ok.  After all, we learned what we now know because we wanted to use it. 

Thank you to visitors

Looking back, it seems I started blogging on solo wargaming about one year ago.  Since then, over 11,000 people have visited the site.  This volume is a big surprise.  No doubt, some of the traffic has been through the Lone Warrior website, which has been an inspiration to me.  Another factor has been the pandemic.  Many social wargamers found themselves pushed toward solo wargaming.  If that disaster truly is passing, perhaps they will go back to social wargaming and traffic to sites like mine will diminish. 

Anyway, I hope some of the ideas presented here have been helpful.  

Thanks to all for visiting.  

Should you love your miniatures?


This quote is from Neil Thomas, Wargaming Nineteenth Century Europe 1815-1878.

"Miniature wargaming has advantages over such contrivances as grids and ‘free kriegspiel’, however. Chief among these is the visual beauty of painted miniatures and three dimensional tabletops. Playing a structural wargame or a ‘free kriegspiel’ can be a curiously bland experience: one can feel almost divorced from the action. Miniature wargaming in contrast effectively predicates direct involvement, for the tabletop general identifies closely with the army he or she has collected and painted. This experience of empathy is a vital part of realism, allowing wargamers to put themselves in the position of historical generals: wherever they see an enemy unit routed they feel the elation of victory; the sight of their own units being destroyed engenders all the anguish and humiliation of defeat. For this is not an abstract body of men represented by counters, or sketches on a piece of paper–these are the wargamer’s very own little men. In this way, a miniature wargame can re-enact the historical experience in a manner very different, and infinitely superior to its physically anaemic ‘free kriegspiel’ rival. The problems of scale do however remain. The best approach to miniature wargames design lies in recognising their intractability, by appreciating that any game using figures is an abstract construct..."

While I am big fan of Thomas' One Hour Wargames, I was thrown off by the perspective revealed in the extract pasted above.   Here are my concerns.

1.  "The visual beauty of painted miniatures and three dimension tabletops."   Beautiful is not an accurate description of all tabletops and figures, nor is it necessary.  Bob Cordery used this phrase to describe what he is doing with his style of wargaming: 3D board game.  Don't get me wrong; Cordery also uses painted figures.  His approach to the board, however, is only beautiful if you like the abstract style.  I very much like that style, but I am not sure I would describe it as beauty.  Regarding the minis, seeing detailed painting just makes me feel inadequate.  It is a turnoff.

2.  "The tabletop general identifies closely with the army he or she has collected and painted."  Yes, I am fond of the minis I have collected.  Would I enjoy wargaming more if I carefully painted each mini and thus developed a relationship with it (him)?  No, because the minis are so small I can barely see them.  (Maybe this is why some people love tank warfare so much; at least you can easily see a tank.)  

3.  "The sight of their own units being destroyed engenders all the anguish and humiliation of defeat."  I am a solo wargamer so both sides are my 'own units'.  However, I do get an emotional reaction when one side is losing; I start to cheer for the underdogs.  

Let me suggest this distinction: fine modeling and tabletop wargaming can be related activities but they need not be integrated.  In other words, you can enjoy tabletop wargaming without being a fine modeler.  And not all fine modelers enjoy tabletop wargaming.  They might be just as happy building dioramas.  

Where the two activities (fine modeling and wargaming) come together closely is in RPGs and skirmish games.  When you have a small number of figures whose personal traits are important to the play of the game, painting might be more integral to the hobby.  Or so it seems to me as an outsider.  RPGs do not appeal to me.

Am I missing out by not developing a loving, empathetic relationship with my minis?  HA!  Give me a break. It is just a game.  I send those little guys out to get destroyed in every battle. Fortunately, they can be resurrected for the next fight.   I am not playing House; I am playing War.  In my mind, the minis are first and foremost professional soldiers doing a difficult job.  Their uniforms will be tattered and dirty, not neat and beautifully depicted. Heck, the green army can be green figures and the red army can be red figures.  Paint makes no difference as long as I can distinguish the unit type: artillery, cavalry, regular infantry, or heavy infantry.

The enjoyment comes from the excitement of the battle and the uncertainty about the result, not from the paint.


PS.  Have you ever noticed the guys who paint the inside walls of houses for a career often look a bit dopey?  It is the paint.  It fries their brains.  And it is addictive, so they love painting.  

Just sayin'.


Tuesday, March 9, 2021

Scenario 3 from One Hour Wargames

 This battle is set during the Franco-Prussian war in a fictitious location.  Scenario 3 calls for taking control of two fords.  In the photo shown below, the river is in the center of the battle field, a hill (green) is one corner, and a stand of trees is to one side.  North is to the left and south is the right. 

Rolling for forces resulted in the north army (Prussians) having one artillery unit, two heavy infantry units and three regular infantry units but no cavalry.  The French army had four regular infantry units, one heavy infantry unit and one cavalry unit.  The French appeared to be at a disadvantage since they had no artillery and only one heavy infantry unit.  

The French regulars advanced toward the eastern ford, taking shelter in the village.  The cavalry and heavy infantry rushed toward the western ford. The cavalry unit intended to cross the ford and assault the artillery battery.  Unfortunately, they did get there before the Prussian heavies blocked the ford. 

This setback for the French army was followed by a series of bad event cards: confusion, enemy hits, inability to move, ammunition shortage;, some bad events happened more than once.  They were reeling from all the bad luck. The Prussian artillery was dropping shells on the village where the French regulars were dug in.

However, the tide eventually turned.  The Prussian regular infantry took up their position on the eastern ford, firing ineffectively on the French regulars who were under cover in the village. The Prussians were exposed and taking hits from the French.  Meanwhile, to the west, the French heavy infantry and the cavalry unit were firing accurately on the two Prussian heavies, who eventually broke.  This enabled the French units to rush toward the Prussian artillery unit. 

Meanwhile, to the east, the Prussian regulars lost a unit and retreated back from the ford, so the French regulars advanced.  They outnumbered the Prussians and pressed their advantage.

Shortly thereafter, the artillery battery was destroyed and both the French cavalry and heavies moved toward the surviving Prussian regulars.  The French regulars continued to pepper them with shots.  The last Prussian unit was broken in round 10.  The battle lasted 20 minutes. It was fast and full of action.  The outcome surprised me.  I will try it again soon. 


An interesting battle report from the Thirty Years War

 https://balagan.info/battle-of-schlossmuele-a-tillys-very-bad-day-battle-report

This report was written in an interesting style.  Note that a brief but useful introduction gives the historical background.  A diagram shows the plan for the battlefield.  A single photo shows the actual battlefield used.  The report of the battle provides a nice summary of the action and the results of the rounds without too much detail.  The battle lasted less than ten rounds, which is just fine with me.  Keep in mind that when you develop a battle like this, you are most likely going to play it through several times, with variations.  

Anyway, I liked the style of this battle from the 30 Years War. 

Wednesday, March 3, 2021

Sunday, February 28, 2021

Scenario 2 from One Hour Wargames with floating grid


The duration of this game, including set up, was 25 minutes.  This is a new game board set-up for me.  Hobby Lobby had a framed white MDF board on sale for $18.  Four-inch squares (tiles) from Amazon were about the same price.  I painted some squares green and others blue (for future use as lakes).  See the pictures below. The white road is a convenient use of empty space on the white board.  The tiles can be easily rearranged to set up a new scenario.  This new board is space-efficient and sturdy.  The inspiration comes from Bob Cordery, who uses hexes. 

The first step for this battle was to roll for forces.  The Prussians got four infantry and two APCs.  The Americans got five infantry and one Humvee.  The mission objective for both sides to control both the hill and the crossroads by the end of 15 rounds. The crossroads is closer to the south side of the board and the hill is closer to the north side.  The beginning moves, naturally, were for the Americans to take possession of the crossroads and the Prussians to occupy the hill.  See picture 1.

 The Prussian APC moved up to where it could pound the village from cover.  It was targeting the Humvee.  Some of the American infantry crossed over to some huts.  From there they could fire on the hill from cover.  The second Prussian APC swung around to west and fired on the huts from that location.  

Both sides were losing infantry units.  At this point I realized that the rules do not permit vehicles to end a turn in a village.  The Prussians began the battle with one more vehicle and one less infantry unit.  The odds were they might end up with no surviving infantry units.  In that case, they would not be able to occupy the village.

The American Humvee was taking too many hits, so it moved north where it was out of range of the Prussian APC yet could fire on the hill.  Next round, the infantry in the village abandoned it to reinforce the units in the huts.  

The battle was very close but at the end, all the Prussian forces were destroyed.  The one remaining American infantry unit proudly took possession of the hill (picture 2).   


Picture 1. Round 2.

Picture 2.  End of game.


Replay.

This time the Prussian begin by placing an APC unit on the hill in hull-down position, which reduces hits by two.  The American Humvee unit moved quickly to engage it as did two infantry units.  The Prussians charged the village with all of their infantry, taking hits as they approached while the other Prussian APC unit pounded the village from the tree line.  The defenders in the village were getting hammered.  However, the Prussian APC unit on the hill took so much damage that they withdraw off of the hill and behind it.  The Humvee pursued and finished it off, but the other Prussian APC unit had pulled back also and quickly destroyed the Humvee unit.  The infantry in the village slugged it out until it was obvious that the Americans needed to cross the road to the stand of trees.  They had a firefight that finished off the Prussian infantry but left only one American infantry unit.  The Prussian APC destroyed it.

Many More Replays

The OHW book contains a table that allows you to randomly configure the units for each side.  The number of possible unit types is four in each era.  Neither side should have exactly the same mix.  The number of possible combinations is....(drum roll)...a lot.  You do the math.

Also, using the event cards suggested by the author is a good idea.  They introduce an exciting random element into the battle.  Yes, it is fair; bad and good luck can hit both sides. 

Anyway, I will have to replay many times before i need to reshuffle the tiles to create the layout for the next scenario. 

***

OK, I have been playing this scenario for four days now, sometimes twice a day.  By rolling for configuration of forces, each game is different.

(TIP:  the army coming from the south should take possession of the village and try to hold it.  Both sides should ignore the hill.  The village has cover and the hill has none (except when  a tank is on the hill).   The battle will be won or lost at the village.)

Here is my insight for the day about OHWs: by rolling for the forces, I can play the same scenario for a week without getting bored.  AND if I change the era, I can repeat the process the next week and each game will be different.  OHW has nine eras, each with slightly different rules.  That works out roughly to 9 weeks of play on this scenario.  The book has 30 scenarios.  

My hat is off to Neil Thomas for developing a brilliant system.  Shear genius.

Saturday, February 27, 2021

another great blog

 https://narrativesolowargames.blogspot.com/

I like the narrative style of game reporting, the use of One Hour Wargames scenarios, and the gridded battle field. 

Desert Shield and Storm

 In a letter to the American Legion Magazine, March 2021, John Walsh wrote that Shield and Storm did not show capabilities for future warfare.  Instead, they were, he opined, postscripts to conventional war.  Enemies are not likely to engage the USA force-on-force because we have too many big weapons. 

I suspect Mr. Walsh is correct.  Warfare has moved beyond the big-army phase.  Instead, insurgencies, irregular warfare, and hit-and-run operations are tactical problem. We could win a war by destroying a country from afar but that is not acceptable. Instead, combined arms operations using highly mobile forces are necessary.  

Wargamers will be modeling scenarios in which the objective is to engage the enemy directly in smaller operations where both sides are highly mobile and both sides may have man-carried missiles as well as other technological advances.  Scenarios might be borrowed from the American western expansion instead of the European colonial era.  The battle of Little Big Horn is not a good example but I am sure others can be found. 

Tuesday, February 23, 2021

Rebellion: 2021! A Steam Punk Campaign, Part 1.


Rebellion: 2021! A Steam Punk Campaign, Part 1


Context

In this Steampunk universe, motive power is based on steam, not the internal combustion engine.  Gas provides lighting.  Airships are used for military and passenger transport.  Trains haul heavy freight over land.  Steamships carry freight over the seas.

Weaponry mass produced after 1860 in our universe does not exist in this Steampunk universe.  This includes machine guns and accurate, large-bore artillery. Bullets can be mass-produced but production cost and logistics are prohibitive for armies with small budgets.  Soldiers are expected to aim their rifles instead of spraying bullets. 


Source: https://en.wikipedia.org/wiki/Steampunk


Alternate History

After the American Civil War, the United States slowly tried to heal itself while also expanding to the west.  A bellicose attitude appealed to the national psyche, leading to a war with Spain and other conflicts. When a devastating and unnecessary war exploded in Europe, the USA joined in decisively.  This was a contributor to a world-wide flu epidemic that killed uncounted millions of people.  The Constitution was amended to ban alcoholic beverages.  This led to an enormous violent crime wave, political corruption, and wide-spread breakdown in respect for established institutions. Economic activity was feverishly intense in the 1920s but it led to a stock market crash and the Great Depression.  The American citizen was reeling from these blows and just starting to feel recovered when another war broke out in Europe. A generation of young people was sent over the Atlantic and fought its way across the continent.  The trench warfare of WWI had been replaced with a military dogma that called for constant frontal attack based on the theory, derived from analysis of the war between Russia and Japan, that aggressive offense would always overcome defensive positions.  Millions died in insane charges.


Source: https://upload.wikimedia.org/wikipedia/commons/5/55/Assaut-Kin-Tch%C3%A9ou.jpg


By the end of the war, the American voter was finished with trusting their government.  Isolationism was the preferred policy stance for almost everyone.  The draft was remembered as gross overreach by an oppressive government.  A small standing army was retained but for the most part, the national defense would henceforth rely on voluntary support from local militias.

Europeans agreed that their governments had been devastatingly incompetent.  Revolutions across the globe destroyed nation-states and returned to smaller entities.  Citizens strongly believed in their right to bring down any oppressive government.  Most families had guns and were willing to use them.  Exceptions were empires in Britain, Japan and central Russia which emerged from WWII shaken and shrunken but still strong.


Source: https://upload.wikimedia.org/wikipedia/commons/c/cc/Revoluci%C3%B3n-marzo-rusia--russianbolshevik00rossuoft.png


The remnants of the old governments persisted in their warlike tendencies.  Simmering conflicts in Korea, Vietnam, South America, the Balkans, central Asia, north Africa, east Africa, southern Africa and other places exploded successively.  These conflicts did not become world wars because most countries lacked the national will for heavy commitment into foreign wars.  The USA sometimes sent expeditionary forces that were small and composed only of professional soldiers.  This allowed them to support allies and train their troops without losing a lot of resources or inciting a political backlash.

In the year 2021, the state of Wisconsin was a largely agricultural state populated by people who cherished their liberties and distrusted central governments. Many were combat veterans and still owned rifles, with which they practiced grimly in preparation for the time when resistance to the central government might be necessary.  They anticipated that day might come soon, because the state legislature had developed a taste for raising taxes on the smaller towns to support the large cities. In January, most people in the small city of Fort Atkinson ignored the presidential inauguration.  Instead, they turned their attention toward Madison.  A delegation was sent to the capitol formally informing the Governor and the legislature that recently enacted tax increases would not be paid. They declared themselves to be a Free City. The simmering pot had come to a boil.


Source: https://upload.wikimedia.org/wikipedia/commons/8/81/German_airship_bombing_Warsaw.JPG


The Battle

Three platoons of the mech infantry company sent by Madison to restore order came in armored personnel carriers. They were accompanied by a tank unit. All vehicles were steam powered. They drove east on Highway 12 then took Highway 18 to Jefferson.  A field artillery unit was loaded onto a barge on the Rock River.  They would move southwest toward Fort Atkinson. An elite platoon of airborne infantry was carried by airships.  When the units arrived by road and boat for the assault on the city, the airborne unit would drop through the clouds into Barrie Park by the pavilion for a surprise assault from the rear.  The field artillery piece would be fired from the boat. In sum, the State units had one artillery unit, two APCs, two regular infantry, one tank unit and one airborne ranger unit.  The battle plan for the State forces was to capture the fortified municipal building.  However, they were unaware of the ambush that has been set for them.


Map 1.


The Free City was defended by a citizen militia company composed of six mech infantry platoons.  All were combat veterans.  Sentries monitored the train station and roads while fortifications were constructed in strategic locations. Encircling the city with a wall was not possible.  Instead, defense relied on stopping the advance of the attacking force north of the city where Business 26 enters the town near the Rock River (see first map).  A wooded area at that location (Klement Park) offered cover and allowed ambushing either the road or the river, or both (see second map).  City leaders hoped to hold out until militia units from other towns could come to their aid, just as hundreds of patriots rushed to Lexington and Concord in 1775.  Four steam-powered Humvees were placed in the park.  Two others were behind the industrial center where they could reinforce at the opportune moment.  The Humvees carried anti-tank guns as well as machine guns.  They were lightly armored. The defenders were in an excellent position for an ambush but were unaware of the airborne rangers and did not know the barge with its artillery unit would be coming toward them.  The ambushers had cover and the advantage of surprise but they had placed themselves in a box.

All reinforcements arrived in Round 5.


Map 2.


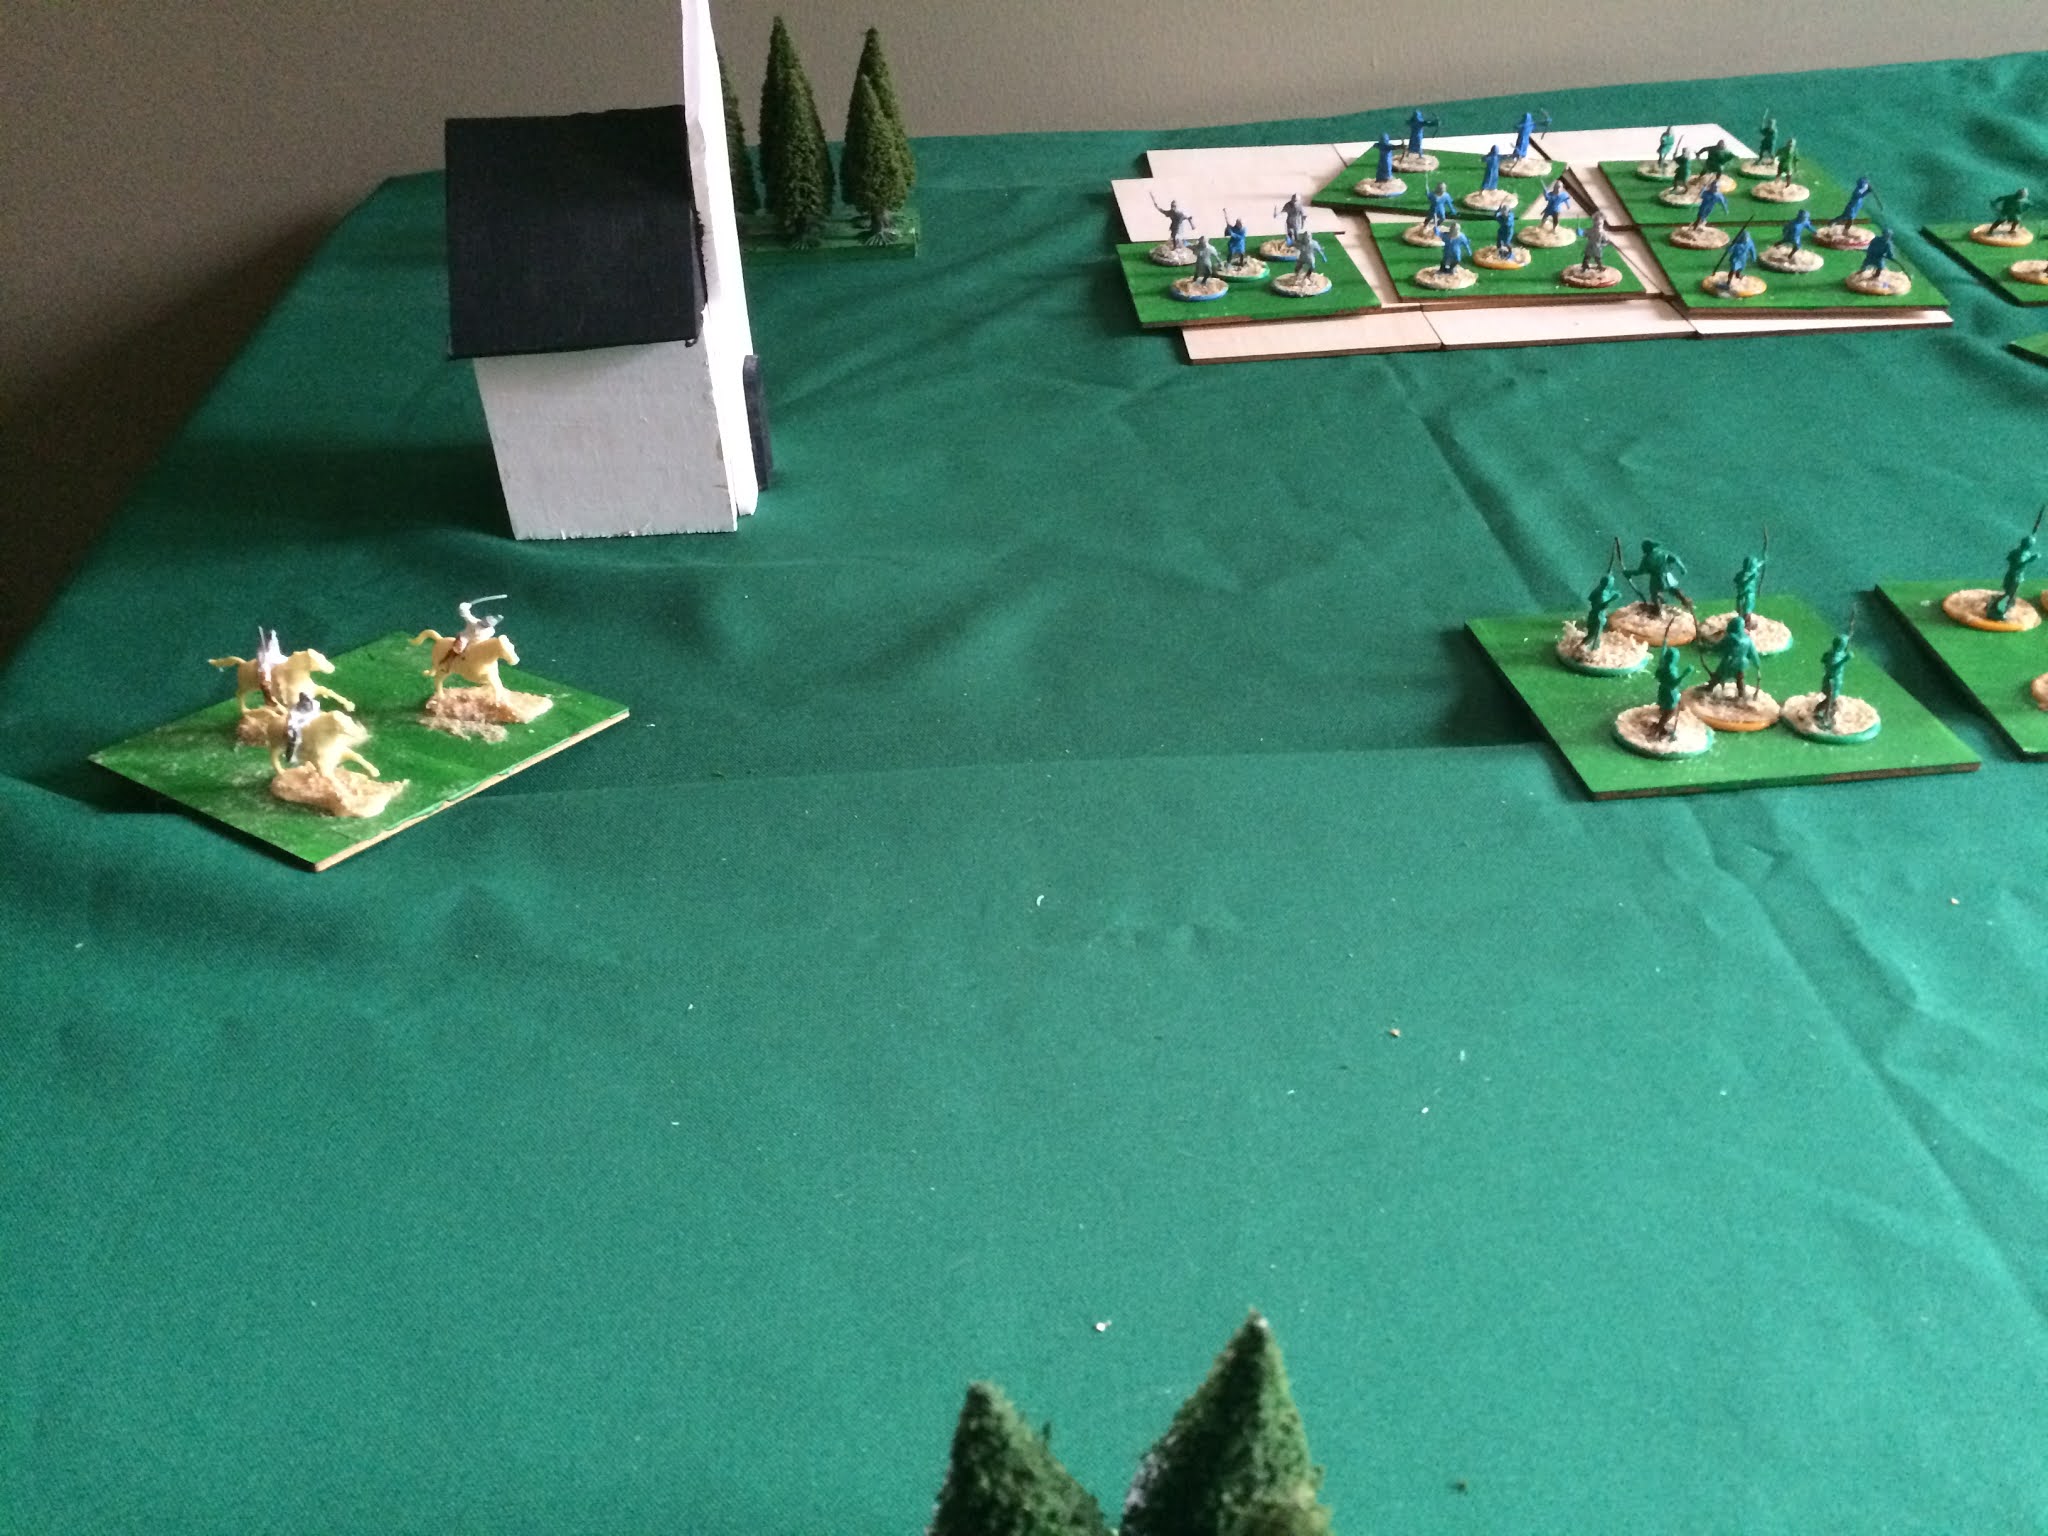
In picture 1 below, you can see the attacking units advancing toward the positions where the ambushers could begin firing.  The APCs each carried one unit of infantry (3 figures) who offloaded as soon as the action began.  The ambushers were forced to fire both east and west.  This prevented them from being able to concentrate their fire.


Picture 1.  The attacking units are moving toward the ambush point. 


As the battle progressed, the infantry moved after leaving their APCs.  Damaging armored vehicles that were protected by cover was not possible for the infantry so they moved into the park where they had clear shots.  The reinforcing airborne rangers also moved toward the ambushers.  Two Humvees held in reserve by the defenders advanced on the column and began hitting the tank with antitank rounds.  However, their shooting was poor.  They destroyed the tank but were too damaged to resist fire from the nearest APC and were eventually destroyed.  The ambushers destroyed the artillery unit on the barge and some of the infantry but in the end only one Humvee remained and it had to flee (see picture 2).


Picture 2. The surviving defender retreats.


On the second run-through, the ambushers were more protected by their cover and the reinforcing Humvees had better aim.  The final result was a clear victory for the defenders. See Picture 3.  The APC was destroyed in the next round.


Picture 3. Alternate Ending: The ambushers were successful.


Conclusion

The airborne rangers were important to the attack.  The attackers also had a tank but that was not more effective than an APC because the Humvees had anti-tank weapons.  It seems they should have left their tank at home and brought another APC with infantry unit.

The ambushers had placed themselves in a box.  They could not concentrate their fire on the road. After the attacking infantry breached the tree-line, the four Humvees were in trouble.  And when the attacking APC was able to move to where it could get a clear shot, the advantages of the ambush position were nullified.

Seven units against six was a toss-up.  Either side could win in this scenario, depending on the luck of the die.  More battles will have to be fought before we know whether the Free City or the Government forces will prevail in this war.